As a chain is only as strong as its weakest link, a sea fishing rig is only as strong as its weakest point – the knot. And if you fish for Skate, Sharks, Tope or big Conger in UK waters, there is always the potential to hook into a fish of a lifetime, therefore you need the strongest possible connection between your mainline and your shock leader. One such knot that is hard to beat is the PR Knot.
The PR Knot is already very popular in America with Jiggers and Poppers as it offers one of the strongest, smoothest and most streamlined connections imaginable. It's also perfect for UK sea anglers because it allows you to connect 50lb sea fishing braid to an 80lb leader, and if required, 130lb braid and 220lb leader for the big stuff. If tied properly, it will have a super small profile and should run through your rod guides easily.
The braid scissors are used to cut a length of braid so you can use it to create your PR Knot. The PR Bobbin is used to create coils around your overlapping braid and mainline and the lighter is to create a ball tag at the point where you cut off the excess leader.
There are other available options for tying the PR Knot. For example you could use a fly tying bobbin, however, to achieve the level of tension required, you need to wind about 4 or 5 turns of braid around one arm of the bobbin holder. It definitely works but a PR Bobbin makes the job a lot easier as it is designed to eliminate all that hassle.
The perfect PR Bobbin for the job is the Stillwater Yomato Bobbin Knotter. It's made from good quality stainless steel, is easily adjustable for tension and has a deep spool for holding the ideal length of braid for knotting. It also features two rubber bands for locking the braid on the bobbin.
So if you are looking for a secure connection between your mainline and leader, being able to tie the PR Knot is an essential skill to master. Also, using a PR Bobbin such as the Yomato Knotter will help you tie a tighter and more secure knot so you can be confident that your knot is 'not' the weakest link in your rig.
 |
| A Neat PR Knot |
The PR Knot is already very popular in America with Jiggers and Poppers as it offers one of the strongest, smoothest and most streamlined connections imaginable. It's also perfect for UK sea anglers because it allows you to connect 50lb sea fishing braid to an 80lb leader, and if required, 130lb braid and 220lb leader for the big stuff. If tied properly, it will have a super small profile and should run through your rod guides easily.
The Essentials for Tying a PR Knot
- A PR Bobbin
- Braid Scissors
- Shock Leader
- Braid or Mainline
- Lighter
The braid scissors are used to cut a length of braid so you can use it to create your PR Knot. The PR Bobbin is used to create coils around your overlapping braid and mainline and the lighter is to create a ball tag at the point where you cut off the excess leader.
How To Tie a PR Knot
- Cut a piece of braid and feed through the PR Bobbin tube.
- The number of wraps on the bobbin will determine the length of the PR knot.
- Rubber rings holds the braid on the bobbin.
- Wind the braid on the bobbin about 10 or so times.
- Lay about 20-25cm of shock leader and braid alongside each other.
- Wrap a couple of coils of the braid and the shock leader around your right index finger and pinch the braid and leader tightly on the left side.
- With your right index finger and thumb, pinch a piece of braid from the PR Bobbin tightly, ready for spinning.
- Spin the bobbin to create a loose layer to get started.
- At one end, create a few tight wraps.
- Lay the braid and mono horizontally.
- Spin the bobbin from you right hand to your left hand to create tight loops. If the loops are not tight, there is a risk of the knot unravelling.
- Spin the braid back over itself from left to right.
- Tie off with a half hitch at one end then tie around 10 alternating half hitches for about 1 cm.
- Trim off the excess leader leaving a few millimetres.
- Use the lighter to create a ball tag at the point where you trimmed the leader.
- Finish the off with a Rizzuto finish
Advantage of Using a PR Bobbin
The key thing in tying a PR Knot is maintaining tension as your create your coils around the braid and mainline. Any slippage introduces slackness into the knot and the potential for the knot to unravel. So the bobbin is weighted to allow you to swing the braid coils to create tight wraps and a neater finish. The PR Bobbin also has a handy drag system which lets you adjust the tension as required.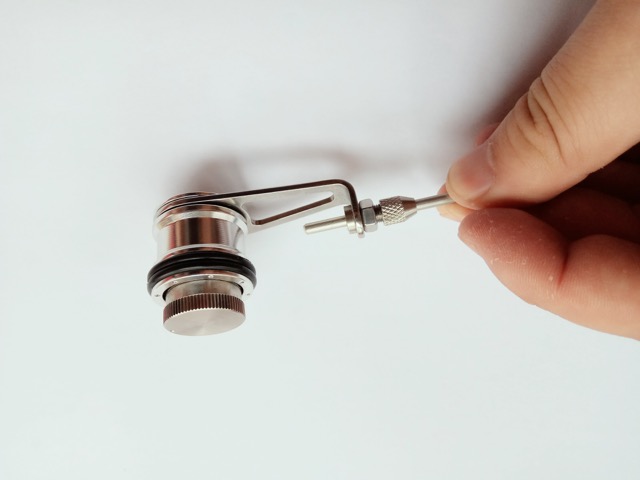 |
| Stillwater Yomato Knotter |
The perfect PR Bobbin for the job is the Stillwater Yomato Bobbin Knotter. It's made from good quality stainless steel, is easily adjustable for tension and has a deep spool for holding the ideal length of braid for knotting. It also features two rubber bands for locking the braid on the bobbin.
So if you are looking for a secure connection between your mainline and leader, being able to tie the PR Knot is an essential skill to master. Also, using a PR Bobbin such as the Yomato Knotter will help you tie a tighter and more secure knot so you can be confident that your knot is 'not' the weakest link in your rig.
Comments
Post a Comment